
My Creative Team


License's

Popular Posts


Saturday, October 1, 2011
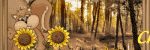
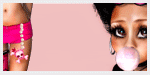
PTU TUT-Greed

Click on pic to see full size
Any resemblance to any other tutorial or signature is merely coincidental and is not intended.
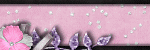
I am using the beautiful art of Arthur Crowe's "Greed" You must have a license to use his tubes.
You can find it HERE
Template used is mine. You can download it HERE in PSD
The kit I used is mine. "Deadly Sins-Greed"
I am using the beautiful art of Arthur Crowe's "Greed" You must have a license to use his tubes.
You can find it HERE
Template used is mine. You can download it HERE in PSD
The kit I used is mine. "Deadly Sins-Greed"
Go to PURPLE LAYER, then selections, select all, float, defloat, paste paper1 as new layer. Go back up to selections, invert, then, on your keyboard, click delete. Go back to selections and click select none. Go to Adjust, sharpen, sharpen. Delete your purple layer.
On your BLUE LAYER, Your going to repeat what you just did with the purple layer. But your new layer will be paper-white diamond. Do everything the same.
On your RED LAYER, do the same as above but with paper6.
On your GREEN LAYER, you will repeat with paper-pink diamond
Your YELLOW LAYER can be change to paper8 by repeating yet again.
Ok, you are going to go back to the layer with Pink_Diamond Paper
Go to select, select all, float, defloat
Copy the tube you are using for your tag and paste as new layer. Move the tube around till you get it placed where you want it. Then back up to Select, Invert, and down to delete on your keyboard.
Change that layer from NORMAL to LUMINANCE LEGACY. Now that tube should be pink or what ever color you used for yours.
After this I decided I needed a couple of borders around my circles.
So go to a circle layer. Then, select, select all, float, defloat, modify, select selection borders. Check both sides, border width 3, Anti-alias checked, then OK
Now go to Layers, New Raster Layer.....Flood fill the selection with the color you choose. Then Select None. You can now merge your border to your circle.
I did this to both larger circles.
That's all there is to it. Now you are ready to add your elements. I am sure you don't want yours to look exactly like mine so just place your elements where you like. And resize them as you see fit..
And last, but not least, do not forget to add the proper copyrights.
I hope you enjoyed my tutorial and was able to follow it.
If you have a suggestion to make it easier, please drop me a comment
Mellow
Subscribe to:
Post Comments (Atom)
FREEBIE BLOG
MY STORES


Facebook Badge

BLOGS I FOLLOW
-
-
-
-
-
-
-
-
New Blog and a New Name3 years ago
-
-
SYHO March Blog Train3 years ago


AS_TrippedDevilishBitch.png)


0 comments:
Post a Comment